

Model Overview & Print Notes
Elegoo Neptune 3 Pro Klipper Upgrade
This page contains instructions for installing Klipper on your stock Elegoo Neptune 3 Pro and model to attach BTT Pi V1.2 inside printer's bottom housing.
I wrote this instruction after upgrading my Elegoo Neptune 3 Pro several days ago and I might forget something. If you try to upgrade your Neptune 3 Pro according to this tutorial and face some issues, please feel free to ask questions or suggest improvements in the comments section.
Updates
- 2025-07-14: Added info how to connect BTT Pi to Neptune 3 Pro via UART without soldering (thanks to @Эрнест for the provided info)
- 2024-04-18: “What you'll need” section is edited: DuPont Jumper Wires of 30cm are preferred instead of 20cm to leave some space for MCU fan.
- 2024-04-17: Screw holes for BTT Pi reduced to D=1.78mm to hold M2 screws better
What you'll need
- 1x BIGTREETECH BTT PI V1.2 (aliexpress, “Only BTT PI V1.2” option)
- 1x MicroSD Card (16Gb or greater is recommended. The greater read/write speeds - the better. I am using 128GB SD card that offers 200MB/s read and 90MB/s write)
- 3x-5x M3 Screws (5-12mm) to screw board holder to printer's case
- 4x M2 Screws (5-8mm) to screw BTT Pi V1.2 to board holder
- 2x wires (20-30cm) to power your BTT Pi V1.2 from Printer's PSU
- Cable ties to do some cable management
- Cables to connect BTT Pi to MCU (see below)
Additionally you will need the following items depending on the MCU ←→ BTT Pi connection method:
- UART (no soldering):
- 3x DuPont Jumper Wires, Male-Female 30cm length (aliexpress, “3 x 40pin Ribbon Kit 30cm” or “40pin Ribbon M-F”)
- UART (a bit of soldering):
- 1x 4PIN 2.54mm Pin Header Male (aliexpress, “Mix Kits 20PCS”)
- 3x DuPont Jumper Wires, Female-Female 30cm length (aliexpress, “3 x 40pin Ribbon Kit 30cm” or “40pin Ribbon F-F”)
- USB type B connector on the front:
- USB 2.0 type B cable
Printing BTT Pi board holder
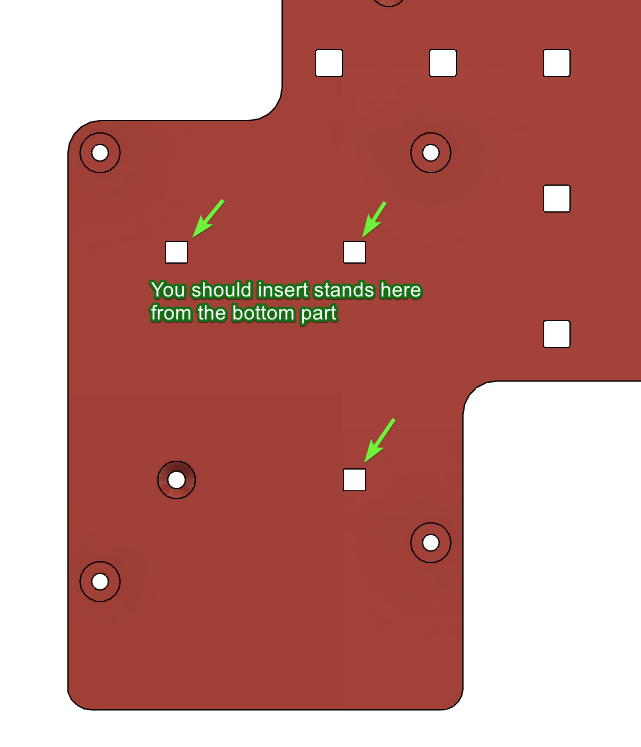
You should print 1x Base.3mf and 3x Stands.3mf (you can print 4 pieces to have a spare part if it's broken while mounting). Models already have some tolerance, so they should print fine on stock calibrated Neptune 3 Pro.
Print settings:
- 0.2mm layers
- 3 top/bottom layers
- 3 wall loops
- Infill 15% Gyroid (or improved 3D Honeycomb in Orca Slicer V2.0.0+)
- No supports
- No brim
- Consider using glue stick for better adhesion (I had problems with warping on PETG when printed Base.3mf)
Assembly
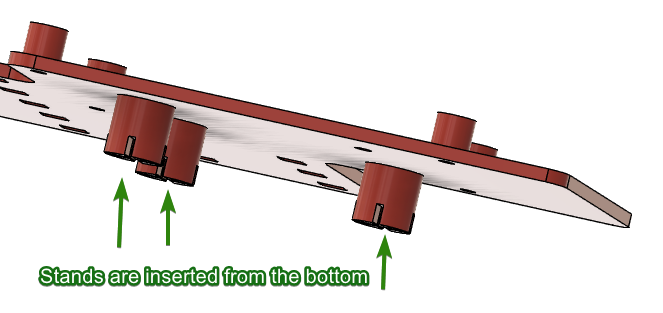
After printing you should attach Stands to the Base (from the bottom side). You can glue them if they are falling out.
Installing Klipper on BTT Pi V1.2
You should download official Debian with pre-installed Klipper from BTT's GitHub here (file is named something like CB1_Debian11_Klipper_XXXXX.img.xz) and flash it on MicroSD card via some tool like Balena Etcher.
After flashing the OS, you should open SD Card in your files explorer and modify two files via Notepad:
1. system.cfg - change your WiFi SSID and password.
...
###########################################
# wifi name
WIFI_SSID="ZYIPTest"
# wifi password
WIFI_PASSWD="12345678"
...
2. BoardEnv.txt - here you should free TTY for MCU connection (by default it is used by Debian for console). Replace “console=display” with “console=serial” and save this file.
...
## default 'display' for debug, 'serial' for /dev/ttyS0
# console=display
console=serial
...
Connecting BTT Pi V1.2 to Printer's MCU
There are three main methods to connect MCU to BTT Pi:
- UART (no soldering) method
- UART (a bit of soldering) method
- USB method
Option 1: UART connection without soldering
Thanks to @Эрнест for pointing out on this soldering-less method, more info about it available here: https://github.com/Arm0ID/Klipper_to_Elegoo_Neptune_UART_RU/tree/main
To connect printer's MCU to BTT Pi V1.2 using UART without soldering you can use internal BTT Pi's GPIO according to this wiring scheme:

| Printer's MCU | BTT Pi |
|---|---|
| GND | GND |
| RX | TX |
| TX | RX |
Option 2: UART connection with a bit of soldering
To connect printer's MCU to BTT Pi V1.2 using UART with a bit of soldering you can use internal BTT Pi's GPIO according to this wiring scheme:
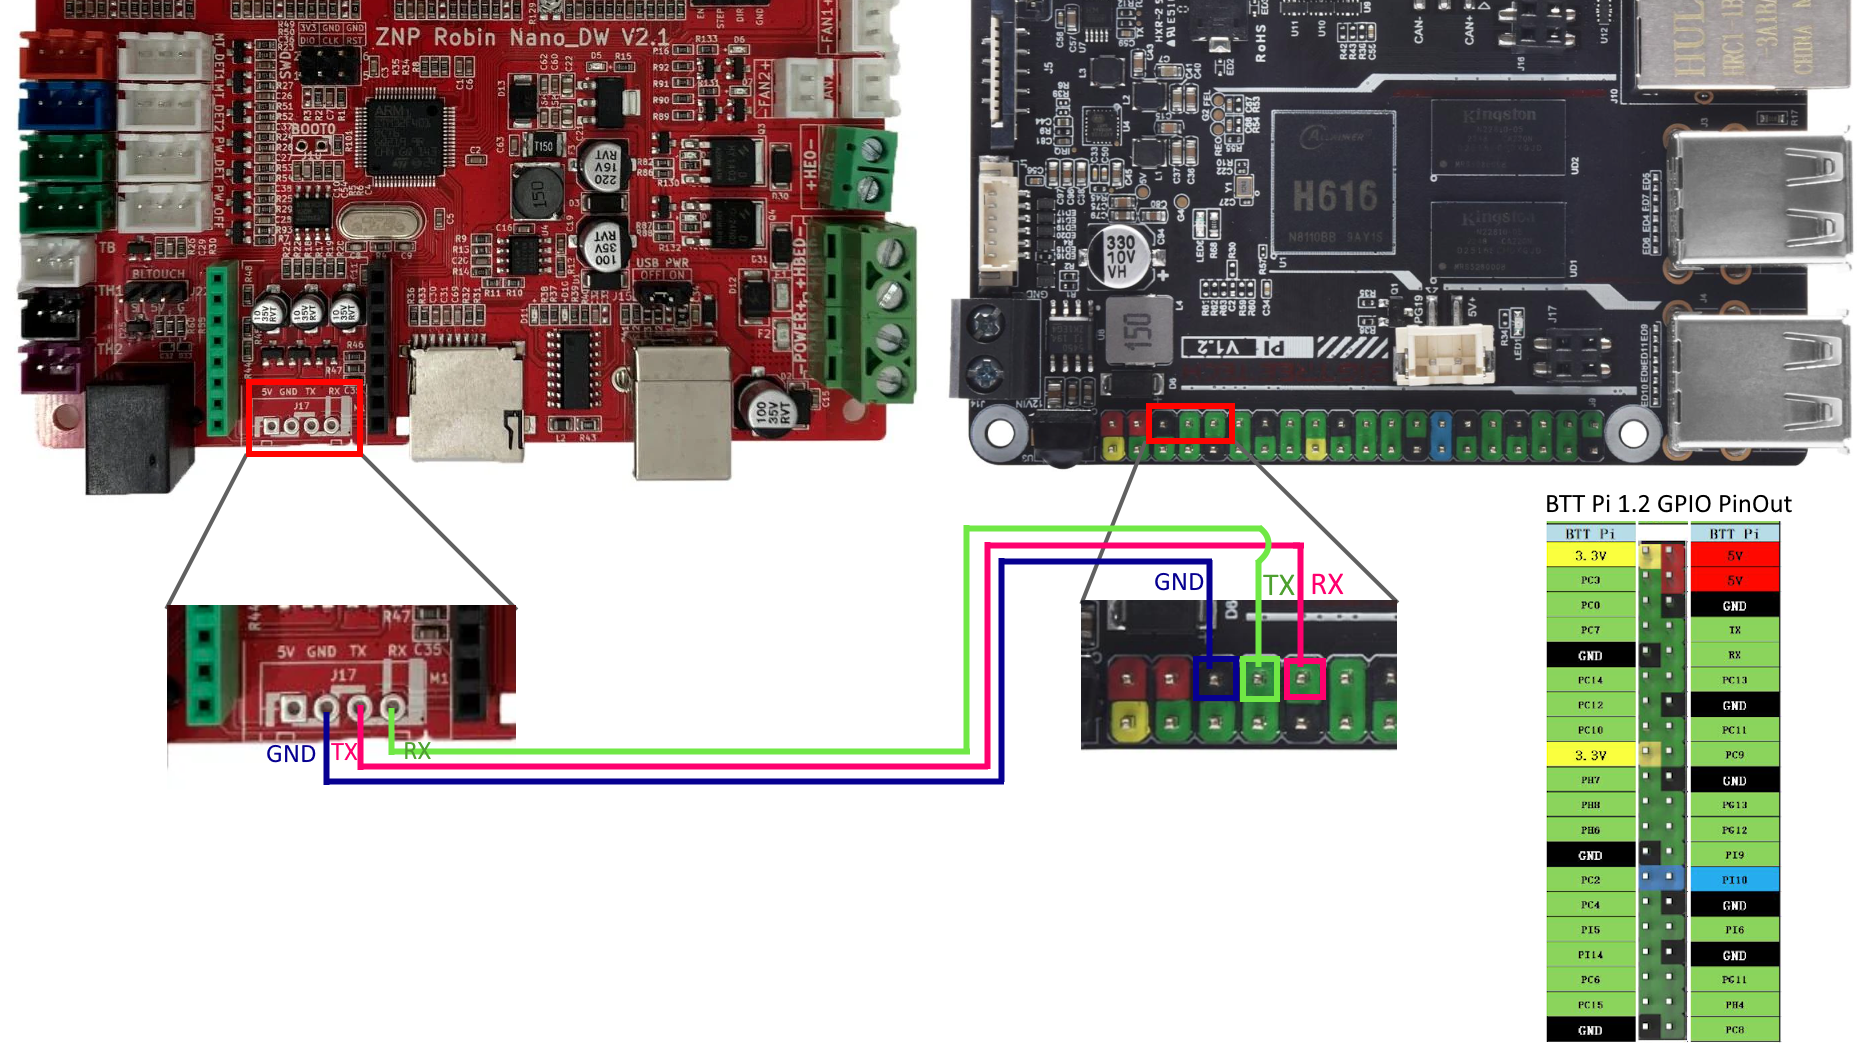
| Printer's MCU | BTT Pi |
|---|---|
| GND | GND |
| RX | TX |
| TX | RX |
To make this connection detachable you can solder male or female 4PIN 2.54mm Header to 4 pins on ZNP Robin Nano on the picture above. Then you can attach these pins with corresponding DuPont jumper wires.
Option 3: USB mode connection
Use USB TypeA-TypeB cable attached to BTT Pi's USB port and printer's Type-B port on the front panel.
Powering BTT Pi V1.2
Then you should connect BTT Pi V1.2 to printer's PSU terminals. Elegoo Neptune 3 Pro has x3 24v ("+" and "-") terminals. One of them is already attached to ZNP Robin Nano_DW MCU and two others are spare. You can use them to power your BTT Pi V1.2. My printer works perfectly with printer's PSU, but if you feel that this power supply is not stable enough for powering your BTT consider using +5V USB Power Adapter and connect it to BTT Pi with USB Type-C cable. Be sure to not power your BTT Pi from +24V and from +5V simultaneously, use only one method to power your board to avoid bad consequences.
Also, please double check carefully what is written on your printer's PSU terminals!
DO NOT EVER attach 110/220v AC to BTT Pi directly.

Flashing the printer
Power up your printer and wait until it connects to your WiFi network. Then you should open your WiFi-router admin panel and search an IP of BTT Pi board. It is recommended to set a fixed IP address for your BTT Pi here, so you always know how to connect to your printer. Read your router manual for instructions on how to do it.
For example, I found out that my BTT Pi has the following IP: 192.168.54.42.
You should connect to BTT Pi via SSH client (e.g. Putty), login/passwords are: biqu/biqu.
Then you should enter the following commands in the terminal:
cd klipper
make menuconfig
Choose settings as on the following screenshot:
- Set “Enable extra low-level configuration options” checkbox to ON (
[*]) (otherwise you would not see PA3/PA2 option later) - Set “Micro-controller Architecture" to “STMicroelectronics STM32”
- Set “Processor model” to “STM32F401”
- Set “Communication interface”:
- For UART connection mode choose “PA3/PA2”
- For USB connection mode choose “PA10/PA9”

Then press “Q” on your keyboard and agree to save your settings.
Build your firmware with the following command:
makeAfter building the firmware, connect to your BTT Pi with WinSCP app and go to the following folder: /home/biqu/klipper/out
Format any other SD card to FAT32 and copy klipper.bin from the BTT Pi to it's root. Rename this file to ZNP_ROBIN_NANO.bin, then safely eject your SD card and insert it into printer's SD card slot. Restart the printer and wait for ~3 minutes to flash it. Your Elegoo screen would not report upgrade progress, it is normal. Currently Klipper does not support Elegoo screens, but you can search for custom projects that allows using it with Klipper later.
Configuring Klipper
After ~3 minutes of waiting after flashing, eject SD card from printer, restart printer again, open your BTT Pi IP address in the browser (e.g. http://192.168.54.42 in my case, your IP will be different) and go to the Machine section on the sidebar.
Open file named printer.cfg, erase it completely and insert TheFeralEngineer's config in this file (btw you can find many videos from TheFeralEngineer on YouTube on how to configure Klipper and how to set it up on Elegoo printers).
Change serial port in the file:
[mcu]
# If printer is connected to the BTT Pi's GPIO, use /dev/ttyS0
# If printer is connected to the BTT Pi's USB port, try /dev/ttyUSB0
# or /dev/ttyACM0
serial: /dev/ttyS0
Then press Save & Restart button and your printer should be detected by the Klipper.
You should see something like this on the Dashboard tab:

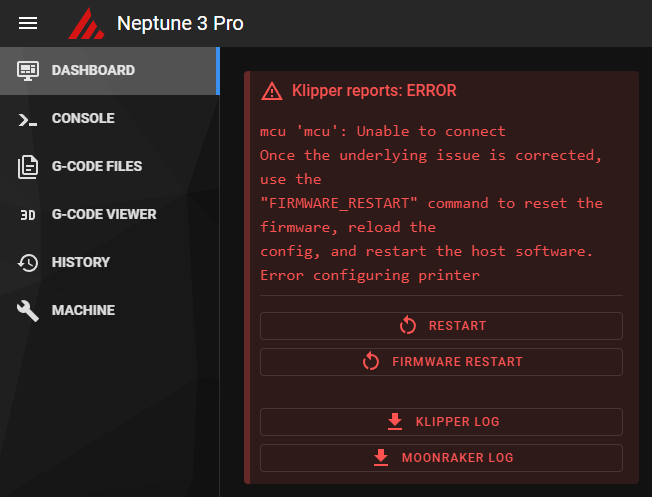
If you see errors like this, it means Klipper could not connect to the printer using UART.
You can try the following:
- Change the serial port in
printer.cfgfile.
You can find the list of available UART ports on your BTT Pi using the following command (enter it in SSH terminal, e.g. Putty):ls /dev/ttyS0 /dev/ttyUSB* /dev/ttyACM* /dev/serial/by-id/*. In my case only /dev/ttyS0 is found but if you are using USB or USB-to-TTL connector your results may be different. - Check UART wiring. RX should be connected to TX and vice-versa.
- Check your UART cable length. Your wires should not be too long or they can be affected to the electromagnetic interference.
- Check that your BTT Pi is not using internal UART port on GPIO for its own purposes. Check that you have changed
BoardEnv.txtfile to setconsole=serialinstead ofconsole=display.
Slicer configuration
You can use default Elegoo Neptune 3 Pro profile in your slicer and change G-Code flavor from Marlin to Klipper. Also, disable any Linear Advance/Pressure Advance in your slicer and calibrate it on Klipper.
Printer calibration
After Klipper detected your printer, you should calibrate it to work properly. I would not describe this part on this page but you can follow these manuals on calibrating your printer:
- Configuration checks - Klipper documentation (also check out other sections - Bed Leveling, Resonance compensation and etc)
- Ellis’ Print Tuning Guide
- I also reduced
max_velocityfrom 500 to 270 otherwise my printer had some weird noise when I moved Y (bed) axis. You can check if your printer has this noise by using the following commands after homing:G1 Y0 F21000andG1 Y120 F21000. These commands move your bed to Y=0 and to Y=120 with a maximum speed that your printer allows (this speed is capped by max_velocity in printer.cfg).
Another good addons worth checking out
- Set up your START_PRINT/END_PRINT macros. This way you can change your Start/End G-Code without re-slicing your models.
- klipper/config/sample-macros.cfg - add this macro to your printer.cfg
- How to use this macro in your slicer
- kyleisah/Klipper-Adaptive-Meshing-Purging: A unique leveling solution for Klipper-enabled 3D printers!
- Using your Elegoo screen with Klipper



💬Printables Community Comments(54)
★Printables Original Reviews