

Model Overview & Print Notes
Summary
Now This is FUN!
Guaranteed hilarious fun in any situation when you brought this with you as a gift or just for the fun of it.
And very easy to make!
(Scroll down this page for the assembly instruction!)
Just a set of M3 bolts, an elastic rubber band and you'r all set. Oh I forgot, a 10 cent euro coin or, 1 dollar cent, or equivalent. A 12x2mm neodymium magnet to hold the cap in the barrel upon lancing completes it. Available for a few cents on AliExpress or similar.
This is a strong and wel build design. It's also safe as a bottle cap is a very big object and the speed it's fired is gentle. This is all ment for fun so it's designed to not look as a real weapon as much as possible.
The print does need some support but only for the two body halfs. No further cleanup.
Have Fun and please give me likes please and of course share your make!
The barrol is compatible with most caps out there. According the international standard for caps, DIN-norm 6099. Cap size 32.10... should be the biggest.
UPDATE 24-10-2019: Made the trigger spring end a bit longer for more spring action.
UPDATE 15-12-2019: Enhanced clearances (0.5) for the trigger axle and pusher components for both models after feedback from the community. Advice to tune your slicer. +/- 0.2 should be your maximum tolerance.
UPDATE 28-12-201: STEEL AXLE Some of you complained about breaking the plastic axle. I changed the position of one of the construction bolds so it is an axle to. As for me not the most elegant solution because if your 3D setup is tuned well it should work fine with the plastic. Both models are here to download.. Pick wise...
UPDATE 01-02-2026: No support Grip On populair demand here you have grips which are more easy to print. A bit less astatic but hey.. who cares.
Witch pieces do you need to print per model:
Version with steel axle:
Beer_Cap_Gun_left_half_32mm_Steel_Axle_v1.stl
Beer_Cap_Gun_Right_half_32mm_Steel_Axle_v1.stl
Beer_Cap_Gun_Pusher_Block_v8.stl
Beer_Cap_Gun_Pusher_v9.stl
Beer_Cap_Gun_Steel_Axle_Trigger_v1.stl
Beer Cap Gun Spanner v8.stl
Plastic version:
Beer Cap Gun left half 32mm v2.stl
Beer_Cap_Gun_right_half_32mm_v2.stl
Beer_Cap_Gun_Pusher_Block_v8.stl
Beer_Cap_Gun_Pusher_v9.stl
Beer_Cap_Gun_Trigger_v8.stl
Beer_Cap_Gun_Spanner_v8.stl
BOQ
One rubber elastic band (Post man type)
Bolds, Hex or Philips or what ever
2mm X 12mm neodymium magnet. Or smaler!
3 x M3 X 8
4 x M3 X 18
One coin: round 20mm and 2 mm thick. Such as a 10 euro cent or a 1 dollar cent.
Print Settings
Printer Brand:
Creality
Printer:
CR-10S
Rafts:
No
Supports:
Yes
Resolution:
1500
Infill:
30% for most parts, print the trigger solid!
Notes:
PETG is too flexible I think so use PLA. Print the trigger SOLID!
Print it strong so it will not break while opening bottles.
Post-Printing

Everything you need....

Start assambling this part but before you do insert the elastic band securing it with two tight knots.
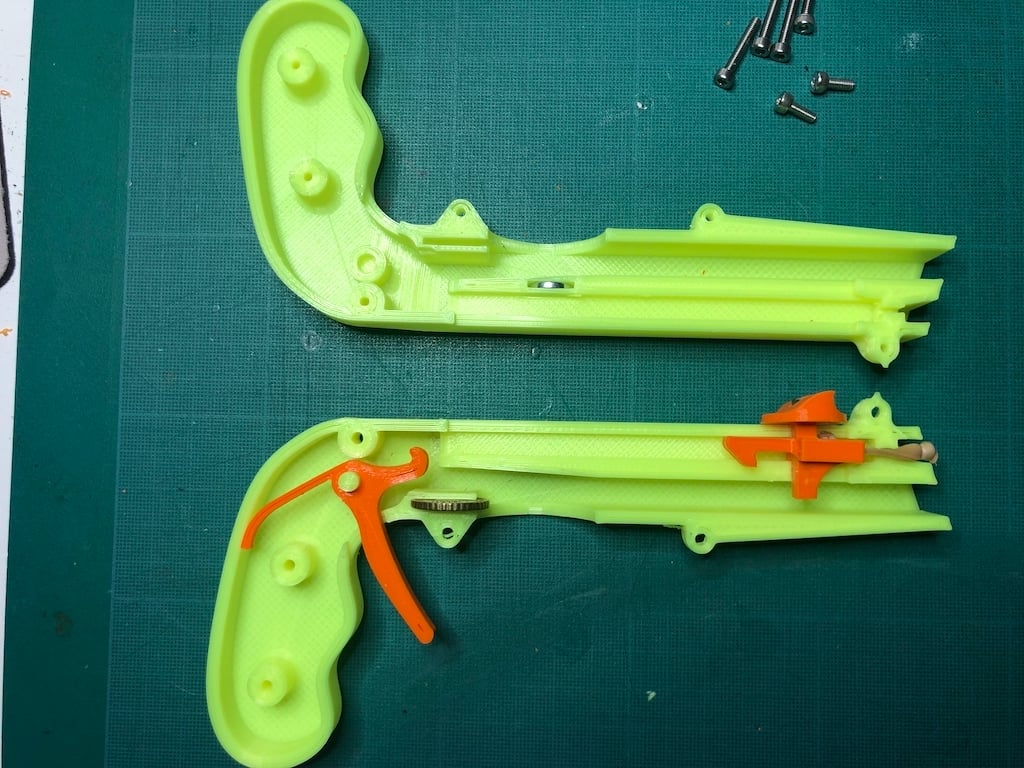
How everything comes together....

Bold both halfs firmly to one piece and there you are. ALL DONE!

Great instruction video by 3D prints and builds

💬Thingiverse Community Comments(148)
★Thingiverse Original Reviews